

Student Accounts: Direct Deposit
Step by Step - Enroll in or Modify your Direct Deposit Refund Set up
- Log into Campus Experience.
- Choose Financials on the Left menu – then scroll in that menu to Direct Deposit Refund Setup.
- Click on Enroll.
- Choose Add Account to enter a new account.
- Enter the Account Name – A name that you want to use to recognize this is your account.
- Account Type is Checking or Saving.
Move to Bank Details and enter your Routing number of your banking institution – This is very important. If you have a check, on the bottom (see image), the left most group of 9 numbers is the routing number – IF you do NOT know your routing number, DO NOT GUESS OR JUST CHOOSE A BANK - Call your banking institution and they will give you that information.
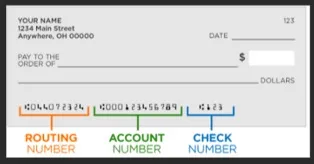
- Go to the next box and enter your Account number – DO NOT ENTER YOUR DEBIT CARD NUMBER – If you do not know your account number, log into your banking institution’s online banking page to get it or call your banking institution.
- Enter who the account holder is – is it you, your parent, or your guardian?
- Click on SAVE.
- Then the Terms and Conditions page comes up – read this and check the box “I agree with the Terms and Conditions.”
- Click Accept.
- On the next page – make sure the account you want to enroll in is selected.
- Click on Enroll.
- You will get a notice that you are enrolled and an option to modify the Direct Deposit if you wish.
Adding a New or Additional Direct Deposit Refund Account
- IF you would like to add another account (parent/guardian) for refunds to them – Select Direct Deposit Refund Set Up from the Menu.
- Click on Modify Direct Deposit.
- Click on Add and complete the information as per the above instructions.
- At the end be sure to select which Direct Deposit Account you wish to be active for refunds.
Ready to Do Great Work?
